Transforming a RDKit depiction function into a Web API with Flask
RDKit is a widely used toolkit to work with molecules in different languages. Web APIs are interfaces that work with request-response message systems, commonly implemented in HTTP and accessible over the internet. Here we will take the RDKit’s function responsible for creating 2D molecular depictions and expose it over the internet, via HTTP, with a request-response system with the help of Flask and Python. We will be able to send molecules in SMILES format and our server will send us back the SVG representation of that molecule.
Environment preparation with conda
Conda is a package, dependency and environment manager for multiples languages. It is very useful to install scientific libraries, since they come compiled and are installed and contained in isolated environment, like Python virtual environments. You can even install Python inside those environments.
Grab the Miniconda installer of Conda. This installer only install Conda and Python, since we do not want the full Anaconda distribution.
$ wget https://repo.anaconda.com/miniconda/Miniconda3-latest-Linux-x86_64.sh
After downloading the installer, we run it with bash passing two options: -b and -p miniconda3. The first one tells the installer not to ask things, and the second one install the package manager in the current directory, inside the folder passed. In our case miniconda3.
$ bash Miniconda3-latest-Linux-x86_64.sh -b -p miniconda3
Once installed, we should source a file that will add certain things to our environment. We look to be able to run the conda command.
$ . miniconda3/etc/profile.d/conda.sh
$ conda -h
Let’s create an environment where to install RDKit. We will also install Python, since we will be using Python to interact with RDKit. We should activate the environment once created, which is similar to activate a Python virtual environment. A flag will appear in our prompt to remember us that we are inside a virtual environment.
$ conda create -n rdkit python
$ conda activate rdkit
(rdkit) $ # We are inside the environment, note the parentheses
Now, if you run python you will see that the Python being used has a ‘Anaconda, Inc. on linux’ after the compiler section:
(rdkit) $ python
Python 3.7.3 (default, Mar 27 2019, 22:11:17)
[GCC 7.3.0] :: Anaconda, Inc. on linux
Type "help", "copyright", "credits" or "license" for more information.
>>>
$ python # This is my computer without the environment activated
Python 3.7.2 (default, Jan 23 2019, 18:44:45)
[GCC 8.2.0] on linux
Type "help", "copyright", "credits" or "license" for more information.
>>>
If all of this worked, we are ready to move to the next section!
Getting RDKit and basic depiction
Conda has the notion of channels, which are “paths” at the package server where the packages that you want to install exists. By default, it defines a few of them, but you can tell under which channel is your package located. In our case, RDKit is listed under five or more, but we will get it from the official channel rdkit.
(rdkit) $ conda install --channel rdkit rdkit
Now you should be able to import successfully the rdkit module.
(rdkit) $ python -c 'from rdkit import __version__; print(__version__)'
2019.03.1
The following code import three functions from different modules of RDKit: MolFromSmiles, Compute2DCoords and MolToFile.
from rdkit.Chem import MolFromSmiles
from rdkit.Chem.rdDepictor import Compute2DCoords
from rdkit.Chem.Draw import MolToFile

molecule = MolFromSmiles('CC(=O)NC1=CC=C(O)C=C1')
Compute2DCoords(molecule)
MolToFile(molecule, "acetaminophen.svg")
We used those functions to convert CC(=O)NC1=CC=C(O)C=C1, the acetaminophen represented in SMILES format, into an SVG. This is the result:

Acetaminophen in SVG created by RDKit.
Great! You created your first representation! Now we should capture the string of the SVG instead of creating the image. We could open the SVG file and read the string, but RDKit can return the string, so no I/O operation involved.
Now, instead of importing MolToFile from rdkit.Chem.Draw, we should import rdMolDraw2D. This module has a class named MolDraw2DSVG which we can use to get the SVG string. After an instantiation and a few methods, we can call GetDrawingText() and we will get our string.
from rdkit.Chem import MolFromSmiles
from rdkit.Chem.rdDepictor import Compute2DCoords
from rdkit.Chem.Draw import rdMolDraw2D

molecule = MolFromSmiles('Cc1ccccc1')
Compute2DCoords(molecule)
drawer = rdMolDraw2D.MolDraw2DSVG(150, 150)
drawer.DrawMolecule(molecule)
drawer.FinishDrawing()
result = drawer.GetDrawingText()
print(result)
$ python rdkit-draw.py
<?xml version='1.0' encoding='iso-8859-1'?>
<svg version='1.1' baseProfile='full'... width='150px' height='150px' >
<rect style='opacity:1.0;fill:#FFFFFF;stroke:none' width='150' height='150' x='0' y='0'> </rect>
...
<path class='bond-5' ... dasharray:6,6' />
</svg>
Finally, knowing how to get the SVG string from a SMILES, we can now install Flask in order to build our little server.
Getting Flask and base app
Flask is a microframework for Python. It is really fast to get started and in a few lines you can have a little server responding to HTTP requests. To get it use pip. Remember that you should be inside the environment created with conda, so flask don’t get installed in the global package space.
(rdkit) $ pip install flask
Now we are ready to write a few lines of Python to get our server up and running!
from flask import Flask, request

app = Flask(__name__)


@app.route('/', methods=['POST'])
def home():
    smiles = request.json.get("smiles")
    return smiles + "\n"


if __name__ == '__main__':
    app.run(debug=True)
This little server should print back the SMILES we send in the data body. We can use cURL to test that is working.
(rdkit) $ python flask-api.py
# Meanwhile, in another terminal...
$ curl -X POST -H "Content-Type: application/json" localhost:5000/ --data '{"smiles": "CCCCC"}'
CCCCC  # It responded correctly
Integrating Flask and RDKit depiction
The main usage of this “depiction server” is to have a web application that can display an image of a SMILES that the user introduces. Representing this application here is a simple HTML that makes requests to http://localhost:5000 and places the data returned to the page.
<!doctype html>
<html lang="en">

<head>
    <meta charset="utf-8">
    <meta name="viewport" content="width=device-width, initial-scale=1, shrink-to-fit=no">

    <link rel="stylesheet" href="https://stackpath.bootstrapcdn.com/bootstrap/4.3.1/css/bootstrap.min.css">

    <title>Hello, world!</title>
</head>

<body>
    <h1>Hello, world!</h1>
    <div class="d-flex flex-wrap justify-content-center images"></div>
    <script src="https://code.jquery.com/jquery-3.3.1.min.js"></script>
    <script src="https://cdnjs.cloudflare.com/ajax/libs/popper.js/1.14.7/umd/popper.min.js"></script>
    <script src="https://stackpath.bootstrapcdn.com/bootstrap/4.3.1/js/bootstrap.min.js"></script>

    <script>
        var smiles = [
            "COC1=CC=C(C=C1)N1N=C(C(N)=O)C2=C1C(=O)N(CC2)C1=CC=C(C=C1)N1CCCCC1=O",
            "CC1=CC=C(C=C1)C1=CC(=NN1C1=CC=C(C=C1)S(N)(=O)=O)C(F)(F)F",
            "S=C1NC2=C(S1)C=CC=C2",
            "[H]C(N)(COP(O)(=O)OCC([H])(COC(=O)CCC\C=C/C\C=C/C\C=C/C\C=C/C\C=C/CC)OC(=O)CCCC\C=C/C\C=C/C\C=C/C\C=C/C\C=C/CC)C(O)=O",
            "CNC1(CCCCC1=O)C1=CC=CC=C1Cl"
        ]

        smiles.forEach((item, index) => {
            $.ajax({
                method: "POST",
                crossDomain: true,
                contentType: 'application/json',
                url: "http://127.0.0.1:5000/",
                data: JSON.stringify({ smiles: item }),
            }).then(function (data) { $(".images").append($('<div>').html(data)) })
        })

    </script>
</body>

</html>
As you probably noted, there is a smiles array that is used for testing purposes. The variable will be loaded from the server or given by the user instead. Before continuing, we should install flask-cors which will help us with the CORS HTTP headers.
(rdkit) $ pip install flask-cors
This is a “fusion” of the last RDKit script, where we got the SVG in a variable and the base server with flask. So here we import both Flask and RDKit things, and make the Flask route to get the SMILES from the request body and pass it to the smiles_to_svg function, that will return the SVG string. Then, the server will return that SVG to the requester.
from flask import Flask, request
from flask_cors import CORS
from rdkit.Chem import MolFromSmiles
from rdkit.Chem.rdDepictor import Compute2DCoords
from rdkit.Chem.Draw import rdMolDraw2D

app = Flask(__name__)
CORS(app)

def smiles_to_svg(smiles):
    molecule = MolFromSmiles(smiles)
    Compute2DCoords(molecule)
    drawer = rdMolDraw2D.MolDraw2DSVG(250, 250)
    drawer.DrawMolecule(molecule)
    drawer.FinishDrawing()
    return drawer.GetDrawingText()

@app.route('/', methods=['POST'])
def home():
    smiles = request.json.get("smiles")
    svg = smiles_to_svg(smiles)
    return svg


if __name__ == '__main__':
    app.run(debug=True)
If we open the HTML, start the server and refresh the page, we should get something similar to this image:
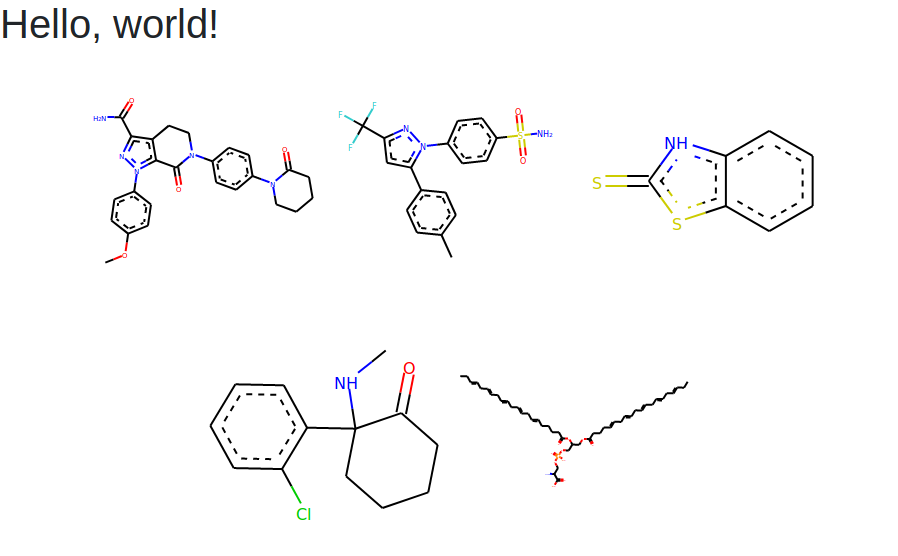
Our page with 5 SMILES.
If only the header appears, check the console of your browser to see what happened with the request sent to the server.
Basic caching for better performance
Caching is important in applications. It could save a lot of computing time, or database query time. So only for the record, here we implement a very very simple cache in memory with the CacheLib package. To install it, just use pip:
$ pip install cachelib
Now we can import the SimpleCache class, instantiate it and feed it with things. When the request comes, the endpoint function check if the SVG for the SMILES has been generated before doing a cache.get with the SMILES. It was created before? It is retrieved and returned. It is not? It is created, saved into the cache and then returned.
from cachelib import SimpleCache

from flask import Flask
from flask import request

from flask_cors import CORS

from rdkit.Chem import MolFromSmiles
from rdkit.Chem.rdDepictor import Compute2DCoords
from rdkit.Chem.Draw import rdMolDraw2D

CACHE_TIMEOUT = 5 * 60
cache = SimpleCache()

app = Flask(__name__)

CORS(app)

def smiles_to_svg(smiles):
    molecule = MolFromSmiles(smiles)
    Compute2DCoords(molecule)
    drawer = rdMolDraw2D.MolDraw2DSVG(250, 250)
    drawer.DrawMolecule(molecule)
    drawer.FinishDrawing()
    return drawer.GetDrawingText()

@app.route('/', methods=['POST'])
def home():
    smiles = request.json.get("smiles")
    svg = cache.get(smiles)
    if result is None:
        app.logger.info(f"Depiction for '{smiles}' not found in the cache. Generating...")
        svg = smiles_to_svg(smiles)
        cache.set(smiles, svg, timeout=CACHE_TIMEOUT)
    return svg


if __name__ == '__main__':
    app.run(debug=True)
Testing this cached version, you should see a log message indicating that something was not found and will be generated and saved.
Summary
So here we took a simple function from a library, RDKit in our case, and transformed it into a service. Using microframeworks such as Flask or Bottle reduces the time spent figuring out how and letting you focus in other aspects of your application.
Resources and further things
- RDKit
- Web APIs at Wikipedia
- Flask
- SMILES format
- Conda
- Miniconda
- MDN CORS documentation
- Flask CORS
- CacheLib
- Bottle
It was useful? Done something similar? Have feedback?